This post may contain affiliate links. Read the full disclosure here.
Gift cards are such a lifesaver during Halloween season! Whether you’re treating your kids’ teachers, thanking the neighbor who always hands out the best candy, or surprising your babysitter, gift cards are practical and always appreciated. But let’s be honest – just handing over a plain card in an envelope feels a little boring, right? That’s where halloween gift card holders come in to save the day!
I’ve been making these fun holders for years now, and my boys absolutely love helping me put them together! It’s become one of our favorite pre-Halloween traditions. These creative holders transform a simple gift card into something memorable and festive. Plus, they’re so easy to make that you can whip up several in one afternoon while the kids are doing homework or watching their favorite show. Let me share my favorite ideas that’ll make your gift cards the talk of the neighborhood!
Mummy-Wrapped Card Holders
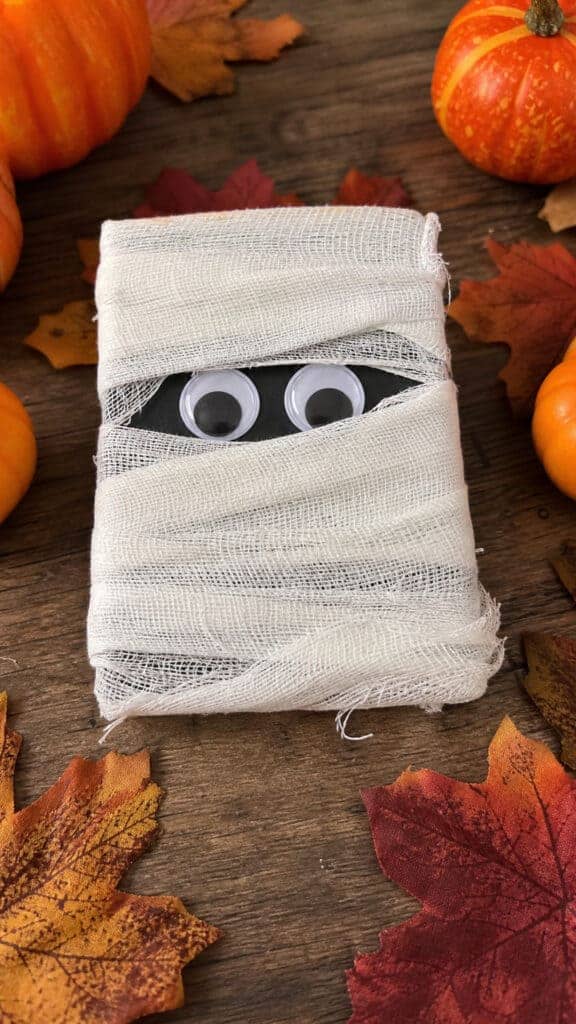

This is hands-down one of my favorite halloween gift card holders because it’s ridiculously simple and the boys think it’s hilarious! All you need is some white gauze or medical tape, googly eyes, and a small piece of cardboard or cardstock. I usually cut the cardboard into a rectangle that’s slightly larger than the gift card, then we wrap it with the gauze in a crisscross pattern to create that classic mummy look!
The best part? My middle son loves being in charge of placing the googly eyes! We use hot glue or strong craft glue to attach two googly eyes near the top of the wrapped holder, and suddenly you’ve got this adorable mummy face staring back at you. You can slip the gift card right into the gauze wrapping, or create a small pocket on the back using tape or glue.
To make it extra special, I sometimes add a small tag that says something cute like “Have a spook-tacular time!” or “Hope this gift doesn’t leave you wrapped up in worry!” The puns are terrible, I know, but that’s half the fun! This holder works perfectly for coffee shop gift cards, bookstore cards, or really any type of gift card you want to give.
One year, I made about fifteen of these for my oldest son’s class, and his teacher told me she kept hers on her desk for weeks because it made her smile every time she looked at it! The mummy holder is also great because it’s gender-neutral and appeals to all ages. Plus, if you’re making multiple holders, you can set up an assembly line with the kids and knock them out super quickly!
Frankenstein Face Pouches
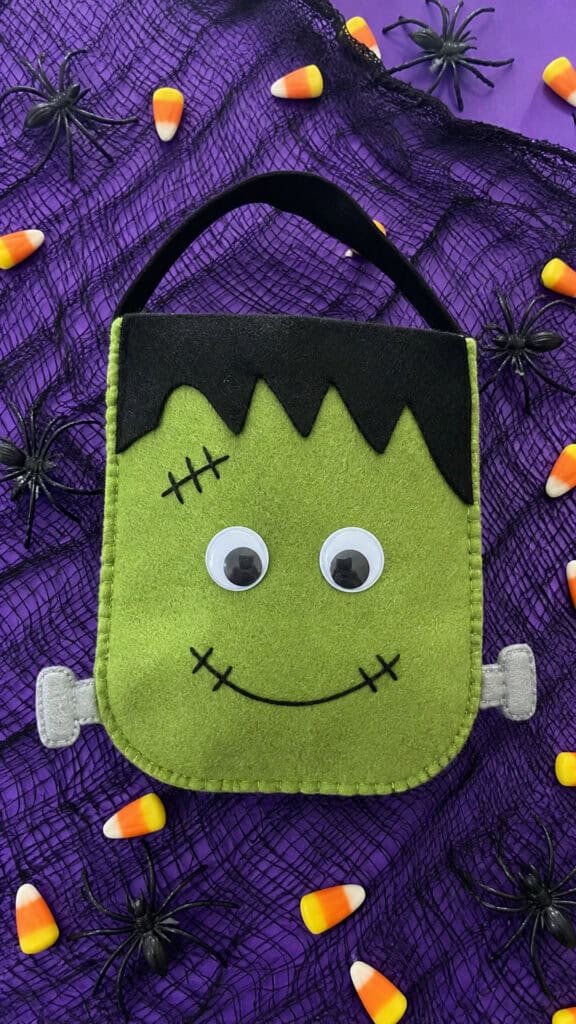
Okay, this one requires just a tiny bit more effort, but it’s SO worth it! Frankenstein face pouches are absolutely adorable and they’re sturdy enough that the recipient can actually reuse them. I use green felt as the base – you can find felt sheets at any craft store for less than a dollar each, which makes this super budget-friendly when you’re making multiple halloween gift card holders!
Cut the felt into a rectangle about 4 inches by 6 inches, then fold it in half and sew or glue the sides to create a little pouch. Leave the top open so you can slide the gift card inside! Now comes the fun decorating part that my boys absolutely love. We use black felt or permanent marker to create Frankenstein’s hair – those iconic jagged bangs across the top. Then we add googly eyes (yes, more googly eyes – we go through SO many during Halloween season!), and draw or glue on a mouth with stitches.
For the stitches, you can use white puffy paint, draw them with a white paint pen, or even hand-stitch them with white thread if you’re feeling ambitious! I usually take the easy route and use a paint pen because, let’s be real, I’ve got three boys to keep track of and limited crafting time. Don’t forget the bolts on the sides of Frankenstein’s neck – we make these with small silver brads or just draw them on with metallic markers.
The beauty of these pouches is that they’re reusable! The teacher or recipient can use them to store other small items later, which makes them feel less wasteful than some other crafts. I’ve made these for my boys’ teachers, and they’ve told me they use them to hold paperclips, USB drives, and other small desk supplies long after Halloween is over. It’s like giving two gifts in one!
Witch Hat Card Toppers
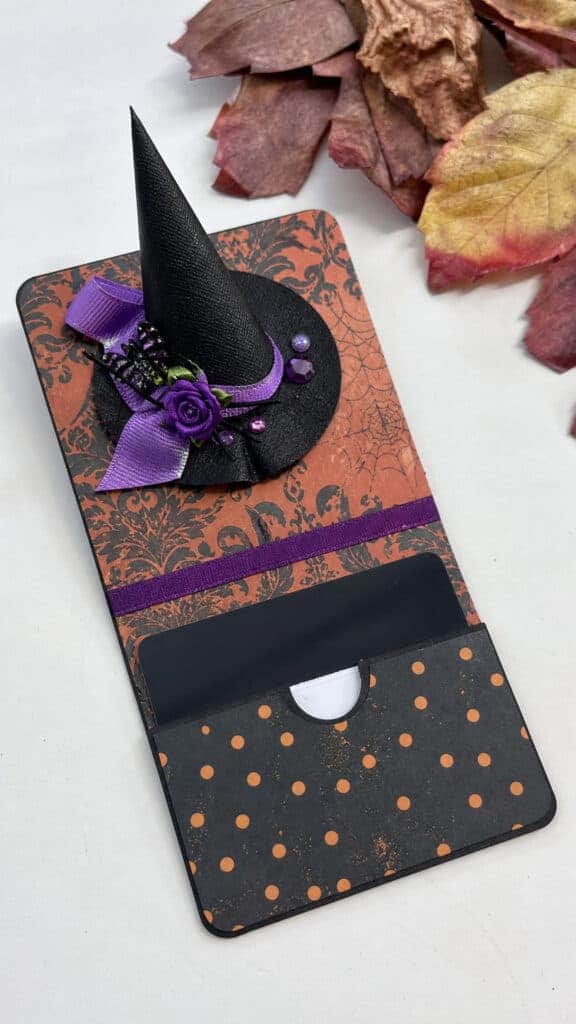
These witch hat toppers are pure magic, and they make any gift card look instantly festive! I discovered this idea when I was scrambling to put together last-minute gifts for my youngest son’s preschool teachers, and now it’s one of my go-to halloween gift card holders. You attach a miniature witch hat to the top of the gift card using a small piece of cardstock as a base, and it creates this adorable 3D effect!
You can make the tiny witch hats from black cardstock by cutting out a circle for the brim and rolling a cone for the top, or you can buy pre-made miniature witch hats from craft stores – I’ve found them at both Michaels and Hobby Lobby during Halloween season. If you’re making them from scratch, use hot glue to attach the cone to the brim, and maybe add a little purple or orange ribbon around the base of the cone for extra flair!
To attach the hat to your gift card holder, cut a piece of decorative cardstock slightly larger than the gift card itself. You can use Halloween-themed patterns like orange and black stripes, purple polka dots, or spooky prints with bats and moons. Glue or tape the gift card to the center of the cardstock, then attach the miniature witch hat to the top using hot glue or strong craft adhesive.
I love adding little embellishments like a small tag that says “Witching you the best!” or “Have a bewitching day!” You can punch a small hole in the cardstock and tie the tag on with black and orange baker’s twine for an extra cute touch. These look absolutely adorable lined up in a row, and they photograph beautifully if you want to share your creations on social media! My mom friends always ask me how I made them when I post pictures!
Pumpkin Pocket Holders
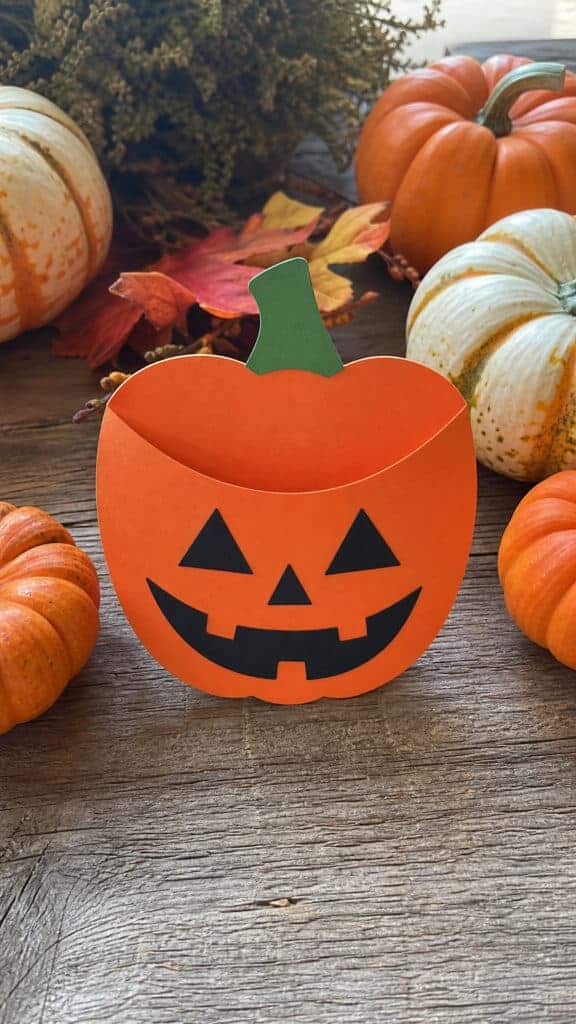
Pumpkin pocket holders are probably the most versatile of all the halloween gift card holders I make because they work for absolutely everyone! Kids love them, adults think they’re charming, and they’re not too scary for the little ones who might be frightened by spookier Halloween decorations. Plus, orange is such a cheerful color that these just make people happy!
I make these using orange cardstock folded into a pocket shape – basically, you cut out a pumpkin shape (I trace around a small plate or bowl to get a nice round shape), then fold it in half and glue or staple the sides to create a pocket. Make sure you leave the top open so the gift card can slide in and out easily! The boys help me cut out jack-o’-lantern faces from black cardstock, and we glue them onto the front of the pumpkin.
You can get really creative with the faces! We’ve made happy pumpkins, silly pumpkins, surprised pumpkins, and even a few grumpy-looking ones that turned out hilariously cute. My middle son loves making the goofiest faces possible, and honestly, those end up being everyone’s favorites! Don’t forget to add a green stem at the top – you can cut this from green cardstock or felt, or even use a real small twig if you want to get fancy!
For an extra special touch, I sometimes add a little texture by gluing on orange tissue paper in a crumpled pattern before adding the face, which gives the pumpkin a more dimensional look. Or you can use orange glitter cardstock if you want something that really sparkles! These pumpkin pockets are sturdy enough that people can reuse them year after year, and I’ve had friends tell me they pull them out every Halloween season to display on their mantels or bookshelves!
Bat Wing Card Sleeves
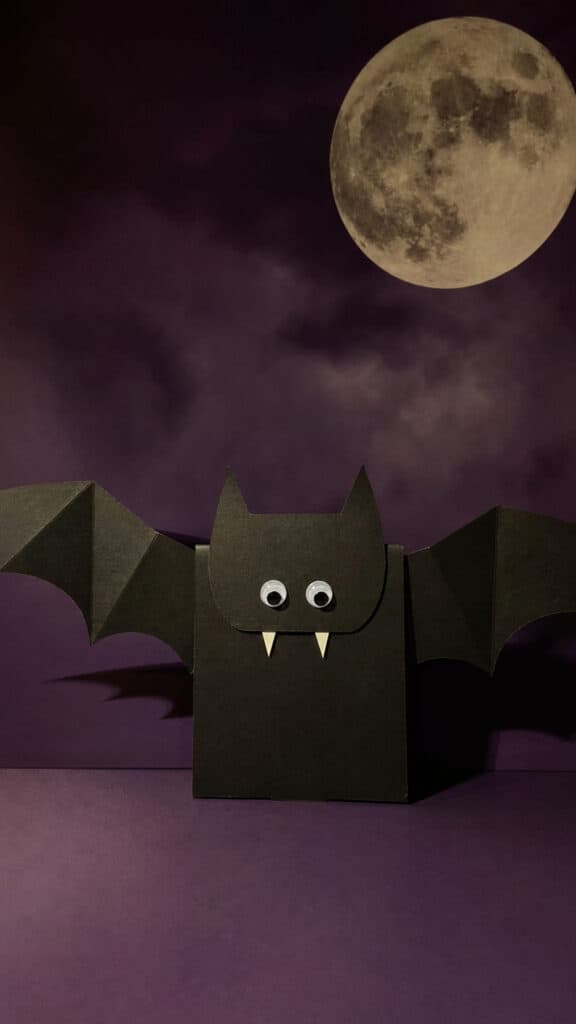
If you want something a little different from the typical halloween gift card holders, these bat wing sleeves are absolutely perfect! They’re sleek, they’re sophisticated enough for adult recipients, but they’re still fun and festive. I started making these when I needed something for my boys’ piano teacher who isn’t really into the cutesy Halloween stuff, and she absolutely loved it!
The concept is simple but looks really impressive! You create a sleeve from black cardstock that fits snugly around the gift card, then attach bat wings that extend out from both sides. To make the sleeve, cut a rectangle of black cardstock that’s about twice the width of your gift card plus a little extra for overlap. Fold it around the card and glue or tape the back seam. The gift card should slide in and out of the top easily!
For the wings, I draw a bat wing shape on black cardstock – you can find templates online if you’re not confident in your drawing skills, or you can freehand it like I do! Cut out two wings and attach them to the sides of the sleeve using glue. The wings should extend outward to create that dramatic bat silhouette. I usually add two small googly eyes to the front of the sleeve and maybe some tiny white fangs cut from white cardstock!
These look especially cool if you use textured black cardstock or even black glitter cardstock for the wings! Sometimes I’ll edge the wings with a metallic silver or purple marker to make them pop even more. You can also add a small purple gem or rhinestone between the eyes for a fancy touch. My oldest son’s art teacher displayed this one in her classroom for the entire month of October, and all the students wanted to know where she got it!
Candy Corn Envelope Holders
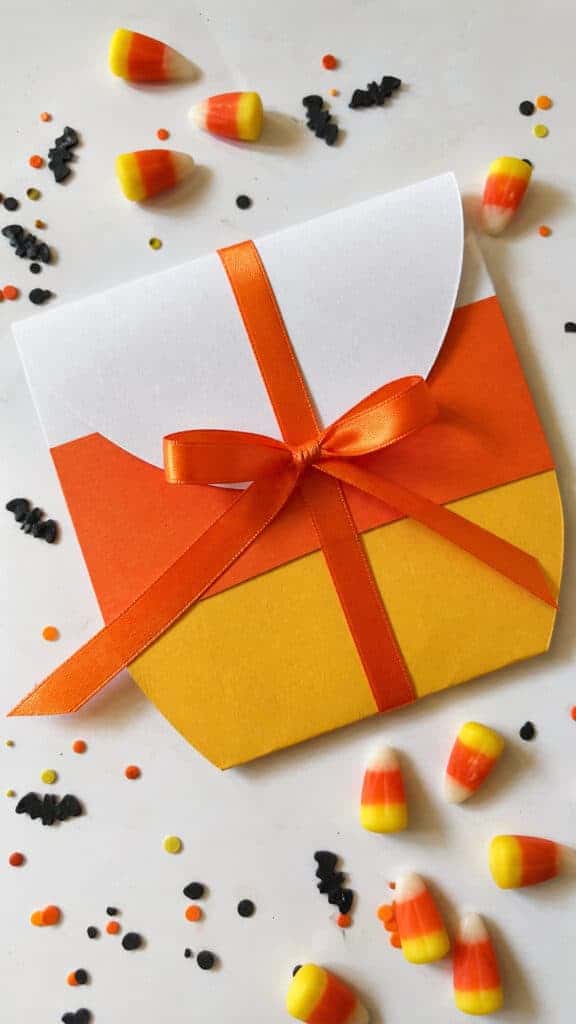
Last but definitely not least, candy corn envelope holders are bright, cheerful, and instantly recognizable! Even people who don’t like eating candy corn (yes, they exist – my husband is one of them!) still love candy corn as a Halloween decoration. These halloween gift card holders are super simple to make, which is perfect for those crazy October days when you’re juggling school activities, costume planning, and trying to keep the house from being completely overrun by Halloween decorations!
You’ll need cardstock in three colors: white, orange, and yellow. Cut out a simple envelope shape from white cardstock – you can find envelope templates online or just trace around an existing small envelope. Before you fold and glue the envelope together, create the candy corn stripes! Cut strips of orange and yellow cardstock and glue them across the white envelope in the classic candy corn pattern: white at the top, orange in the middle, and yellow at the bottom!
Once your stripes are glued down and dry, fold the envelope into shape and glue the sides and bottom, leaving the top flap open so you can insert the gift card. I like to add a small piece of velcro or a sticker to keep the flap closed, or you can tie it shut with orange and yellow ribbon! The boys love helping with this part because the color pattern is easy enough for even my youngest to understand and help with!
These envelope holders are perfect for multiple gift cards if you want to give more than one, or you can tuck in a small handwritten note along with the gift card! I’ve made larger versions of these for gift cards to restaurants where the whole family can go, and smaller versions for individual coffee shop cards. They’re also great because they’re flat and easy to slip into backpacks or mailboxes if you’re delivering them to teachers or neighbors. Plus, the bright colors just make everyone smile – it’s impossible to look at candy corn colors and not feel a little bit of Halloween joy!
Ghost Pocket Pals
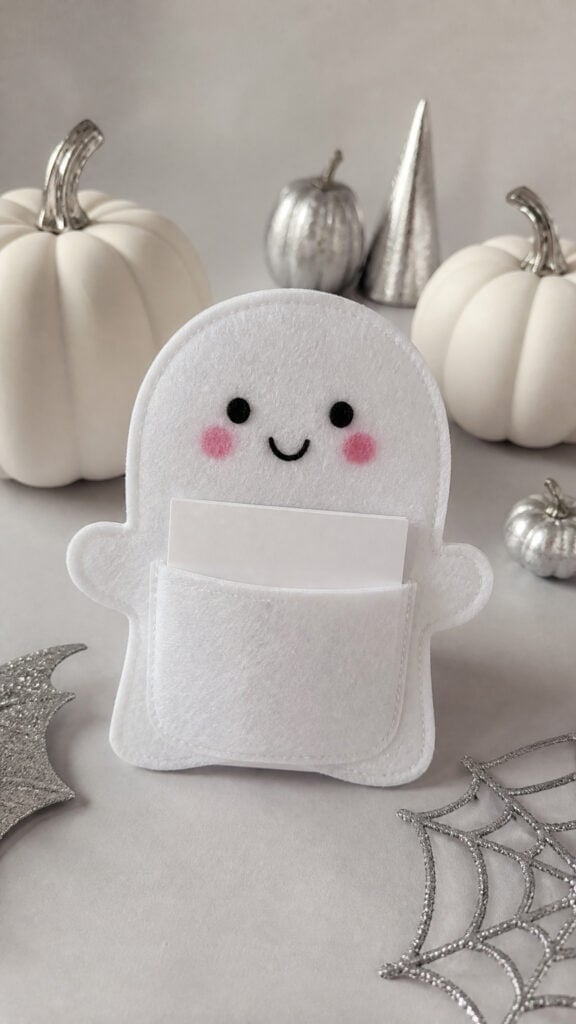
I almost forgot to include this one, but ghost pocket pals have become such a hit in our neighborhood that I had to add them to my list of favorite halloween gift card holders! These are absolutely adorable and probably the easiest of all the options I’ve shared. My youngest son can practically make these by himself now, which tells you how simple they are!
Start with white cardstock or white felt – I prefer felt because it’s a bit more durable and has a nicer texture, but cardstock works great too! Cut out a simple ghost shape with a rounded top and a wavy bottom edge. You can make these as tall or short as you want, but I usually make mine about 5-6 inches tall so there’s plenty of room for the gift card pocket!
Here’s the trick: instead of making a pouch like some of the other holders, you create a pocket by gluing a smaller piece of white cardstock or felt to the back of the ghost, leaving the top open. This creates a flat pocket that’s perfect for sliding in a gift card! Then comes the fun part – decorating the ghost’s face! We use black permanent marker or black felt pieces to create eyes and a mouth. You can make them surprised, happy, silly, or even a little spooky!
I love adding little details like rosy cheeks using pink marker or a tiny bit of pink chalk, or giving them different expressions so each one has its own personality! Sometimes we add small accessories like tiny felt bows or hats to make them extra special. My boys named all the ghosts we made last year, and we had quite the ghost family going! These are perfect for tucking into lunchboxes, backpacks, or handing out at Halloween parties. They’re sweet without being too babyish, and I’ve made them for everyone from preschool teachers to my boys’ soccer coaches!
Making Halloween Gift Giving Extra Special
Creating your own halloween gift card holders is such a fun way to add a personal touch to your gifts this season! I promise you, the time you spend making these is so worth it when you see the recipient’s face light up. There’s something really special about handmade gifts, even when they’re holding something as simple as a gift card. Plus, the memories you’ll make crafting with your kids are priceless – my boys still talk about the year we made fifty mummy holders for their entire school!
Whether you choose the simple mummy wraps, the adorable pumpkin pockets, or any of the other creative ideas I’ve shared, your gift cards will definitely stand out from the rest! Don’t stress about making them perfect – the handmade charm is part of what makes them so special. Now grab your craft supplies, round up the kids, and get creating! Your teachers, neighbors, and friends are going to absolutely love these festive holders. Happy crafting, and have a wonderful Halloween season!